BSc Creative Computing Project - NWC605COM
At the at the start the week I was majorly ill, where I even had to call off sick for work from Monday to Saturday. However on the Saturday I was starting to feel a lot better so I continued on with my work throughout the weekend. I began by working on the mouth and eyes and making sure that the pieces I created matched my reference.
I inserted a poly cylinder for the creation of the nose and started to shape it to its anatomy.
Once this was done I created the nose before then doing the exact same thing that I did to the eyes and mouth. Now I've completed the shaping of the features I used the extrude tool. The reason as to why this came in handy and why I used it, is that it allows me to expand on the faces that is already been made allowing me to create more shape and anatomy.
Using the extrude faces allows me to drag top faces upwards so that I can create some shape. By doing this I learnt that its really good to use this tool to help help expand shapes when needed. I also extruded the side of the models face outwards ans began to shape it so that it matched the side of my face. I also attempted to make ears for my self following the same process as as the head modelling which was okay but its some thing that can be improved.
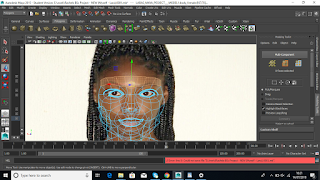
As you can see below I have managed to create the head using a number of tools in order to create the shape your seeing. Firstly I have used the sculpt tool connect & bridge tool to be able to connect the different faces that needs to be joint together so that the correct shape can be made.
Here I spend my time just making sure that I am happy with the topology and making sure that everything is neat and tidy.
Lastly I started to work on the side profile as well as the front view. I previously had image planes in but I took them out to create the head of the model as I found it was easier. I created the skull for the model by
adding a polysphere and setting the subdivisions on the axis to 12 & 8
on the height to get started then I worked around the face I had already created in order to blend the faces together by connecting the faces together.
BSc Creative Computing Project - NWC605COM
I inserted a poly cylinder for the creation of the nose and started to shape it to its anatomy.
Once this was done I created the nose before then doing the exact same thing that I did to the eyes and mouth. Now I've completed the shaping of the features I used the extrude tool. The reason as to why this came in handy and why I used it, is that it allows me to expand on the faces that is already been made allowing me to create more shape and anatomy.
Using the extrude faces allows me to drag top faces upwards so that I can create some shape. By doing this I learnt that its really good to use this tool to help help expand shapes when needed. I also extruded the side of the models face outwards ans began to shape it so that it matched the side of my face. I also attempted to make ears for my self following the same process as as the head modelling which was okay but its some thing that can be improved.
As you can see below I have managed to create the head using a number of tools in order to create the shape your seeing. Firstly I have used the sculpt tool connect & bridge tool to be able to connect the different faces that needs to be joint together so that the correct shape can be made.
Here I spend my time just making sure that I am happy with the topology and making sure that everything is neat and tidy.
Lastly I started to work on the side profile as well as the front view. I previously had image planes in but I took them out to create the head of the model as I found it was easier. I created the skull for the model by
adding a polysphere and setting the subdivisions on the axis to 12 & 8
on the height to get started then I worked around the face I had already created in order to blend the faces together by connecting the faces together.


No comments:
Post a Comment